Eat Pecans
Industry professional? Jump to americanpecan.com
CMS Manual > Content Hub

Content Hub Application

The Content Hub application is a central repository in Xperience where all content item assets used for the website, such as images, resources, etc., are stored. This section explains how to access and manage the Content Hub.

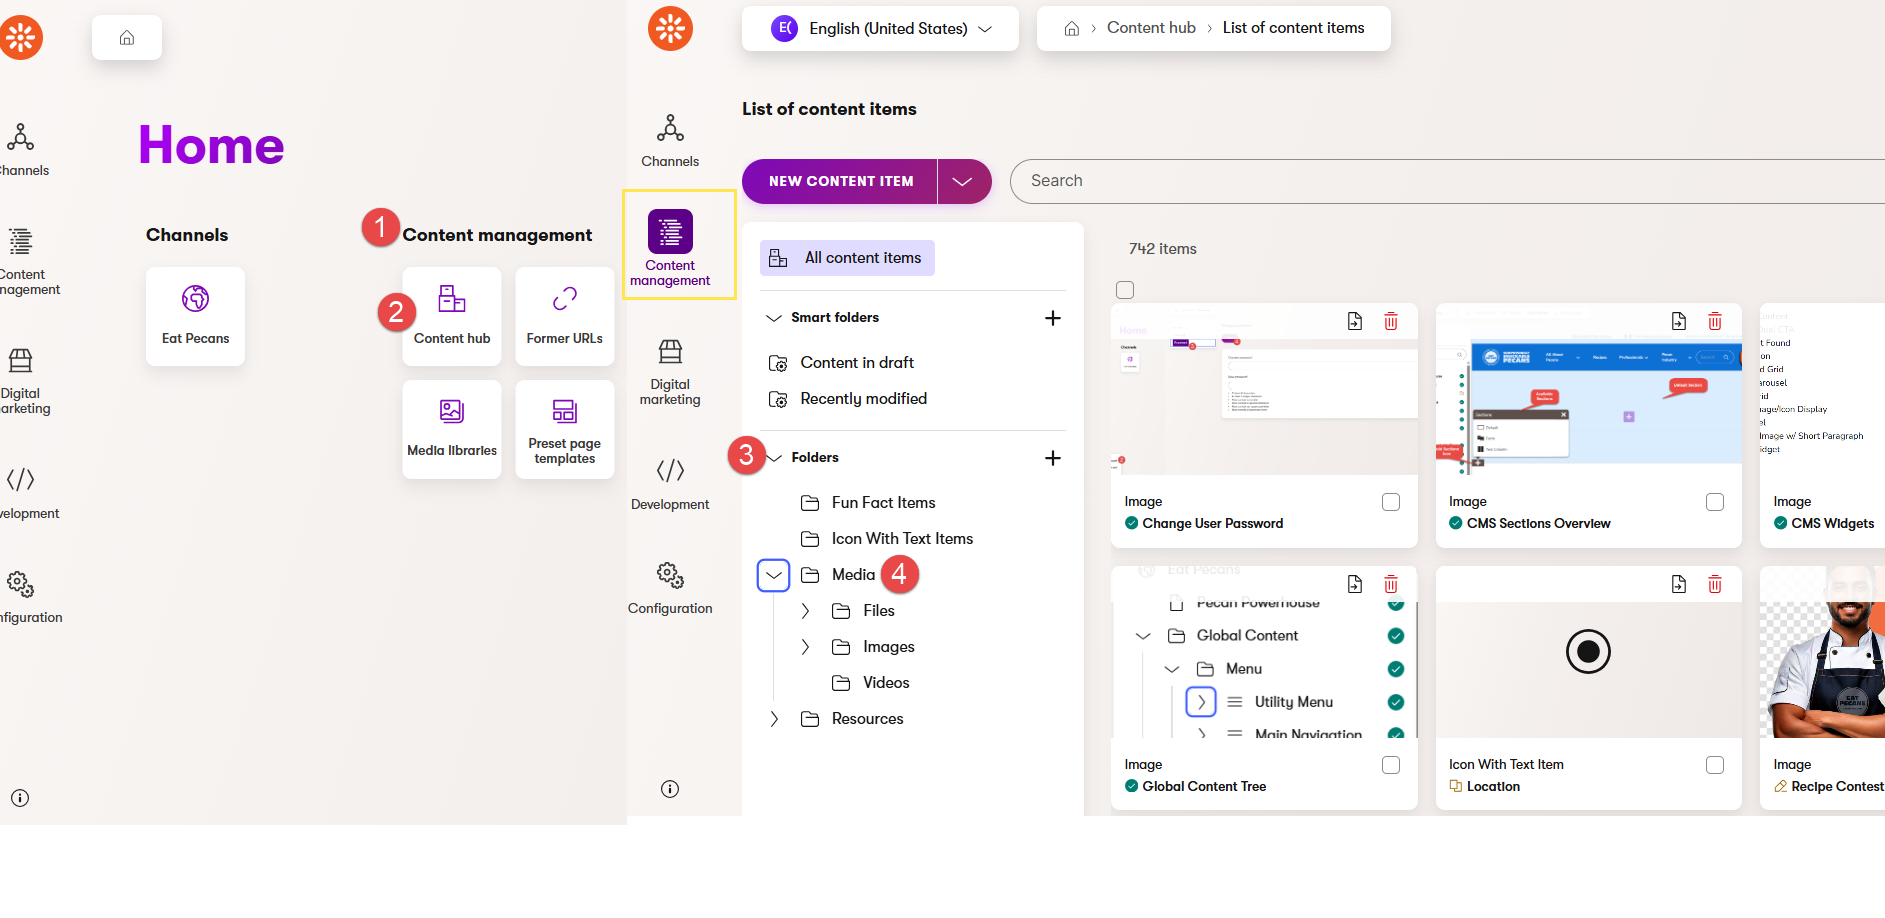
From Home (Main dashboard)

  1. Go to Content management
  2. Click on Content hub
  3. Go to Folders section
  4. Click on Media folder

From Eat Pecans Channel

  1. Click on Content management (left sidebar menu)
  2. Click on Content hub
  3. Go to Folders section
  4. Click on Media folder

How to Navigate to Content Hub

Return to TOP

How to Manage the Content Hub

Within the Content hub, you'll see content item assets organized in different folders. You can create as many folders as you'd like to organize and store all the content item assets used for the website.


For Media

  1. Click on Content management (left sidebar menu)
  2. Click on Content hub
  3. Go to Folders section
  4. Click on Media folder
  5. Click on either List or Grid icon to change the view (Optional)
  6. To add a new Folder: select the parent folder for the new folder, then click on the three dots next to the folder name
  7. Click on New Folder option
  8. Name the new folder
  9. Click on Create button
  10. To upload a Media item: find and click on the folder where the media item will be placed, click on New Content Item button 
  11. Name the content item
  12. Select the Content type (e.g., Image)
  13. Click on Continue button
  14. Click on Upload file button and find the media item on your device
  15. Enter an Alt Text
  16. Click on Save
  17. Click on Publish

Return to TOP

For Resources

  1. Click on Content management (left sidebar menu)
  2. Click on Content hub
  3. Go to Folders section
  4. Click on Resources folder
  5. Click on either List or Grid icon to change the view (Optional)
  6. To add a new Folder: select the parent folder for the new folder, then click on the three dots next to the folder name
  7. Click on New Folder option
  8. Name the new folder
  9. Click on Create button
  10. To upload a Resource item: find and click on the folder where the resource item will be placed, click on the New Content Item button 
  11. Name the content item
  12. Select Resource content type 
  13. Click on Continue button
  14. Fill in the Preview Fields section (optional)
  15. Click on Upload file button and find the content item on your device
  16. Click on Select Tags button and select the category (-ies)
  17. Enter a Published Date
  18. Click on Save
  19. Click on Publish

Return to TOP

For Icon with Text Items

  1. Click on Content management (left sidebar menu)
  2. Click on Content hub
  3. Go to Folders section
  4. Click on either the List or Grid icon to change the view (Optional)
  5. To add a new Folder: select the parent folder for the new folder, then click on the three dots next to the folder name
  6. Click on New Folder option
  7. Name the new folder
  8. Click on Create button
  9. To create an Icon with Text Item: find and click on the folder where the Icon with Text Item will be created, click on the New Content Item button 
  10. Name the content item
  11. Select Icon With Text Item content type 
  12. Click on Continue button
  13. Fill in the fields
  14. Click on Save
  15. Click on Publish

Return to TOP

For Fun Fact Items

  1. Click on Content management (left sidebar menu)
  2. Click on Content hub
  3. Go to Folders section
  4. Click on either the List or Grid icon to change the view (Optional)
  5. To add a new Folder: select the parent folder for the new folder, then click on the three dots next to the folder name
  6. Click on New Folder option
  7. Name the new folder
  8. Click on Create button
  9. To create a Fun Fact Item: find and click on the folder where the fun fact item will be created, click on the New Content Item button 
  10. Name the content item
  11. Select Fun Fact content type 
  12. Click on Continue button
  13. Fill in the field
  14. Click on Save
  15. Click on Publish

Return to TOP