Eat Pecans
Industry professional? Jump to americanpecan.com
CMS Manual > Website Channels

Website Channels

The majority of content updates and new content creation will be made on the Website Channels within Kentico. This section explains the Website Channels, the structure of the website content, and how to manage content.

Website Channels Overview

  • The Website Channels is the section of the CMS where content updates and creation of new content will be made within Xperience for your website. 
  • On the Website Channels, all of the pages for the website are organized in a "tree" structure, called the Content Tree
  • The Content Tree is a visual representation of the hierarchical structure of the content on the website. 
  • Each page on the website uses a specific Content Type that determines the page layout.
  • Each Content Type utilizes a Content Type Icon to help easily identify a page's type in the Content Tree.


See the screenshot below for a breakdown of the areas within the Website Channel
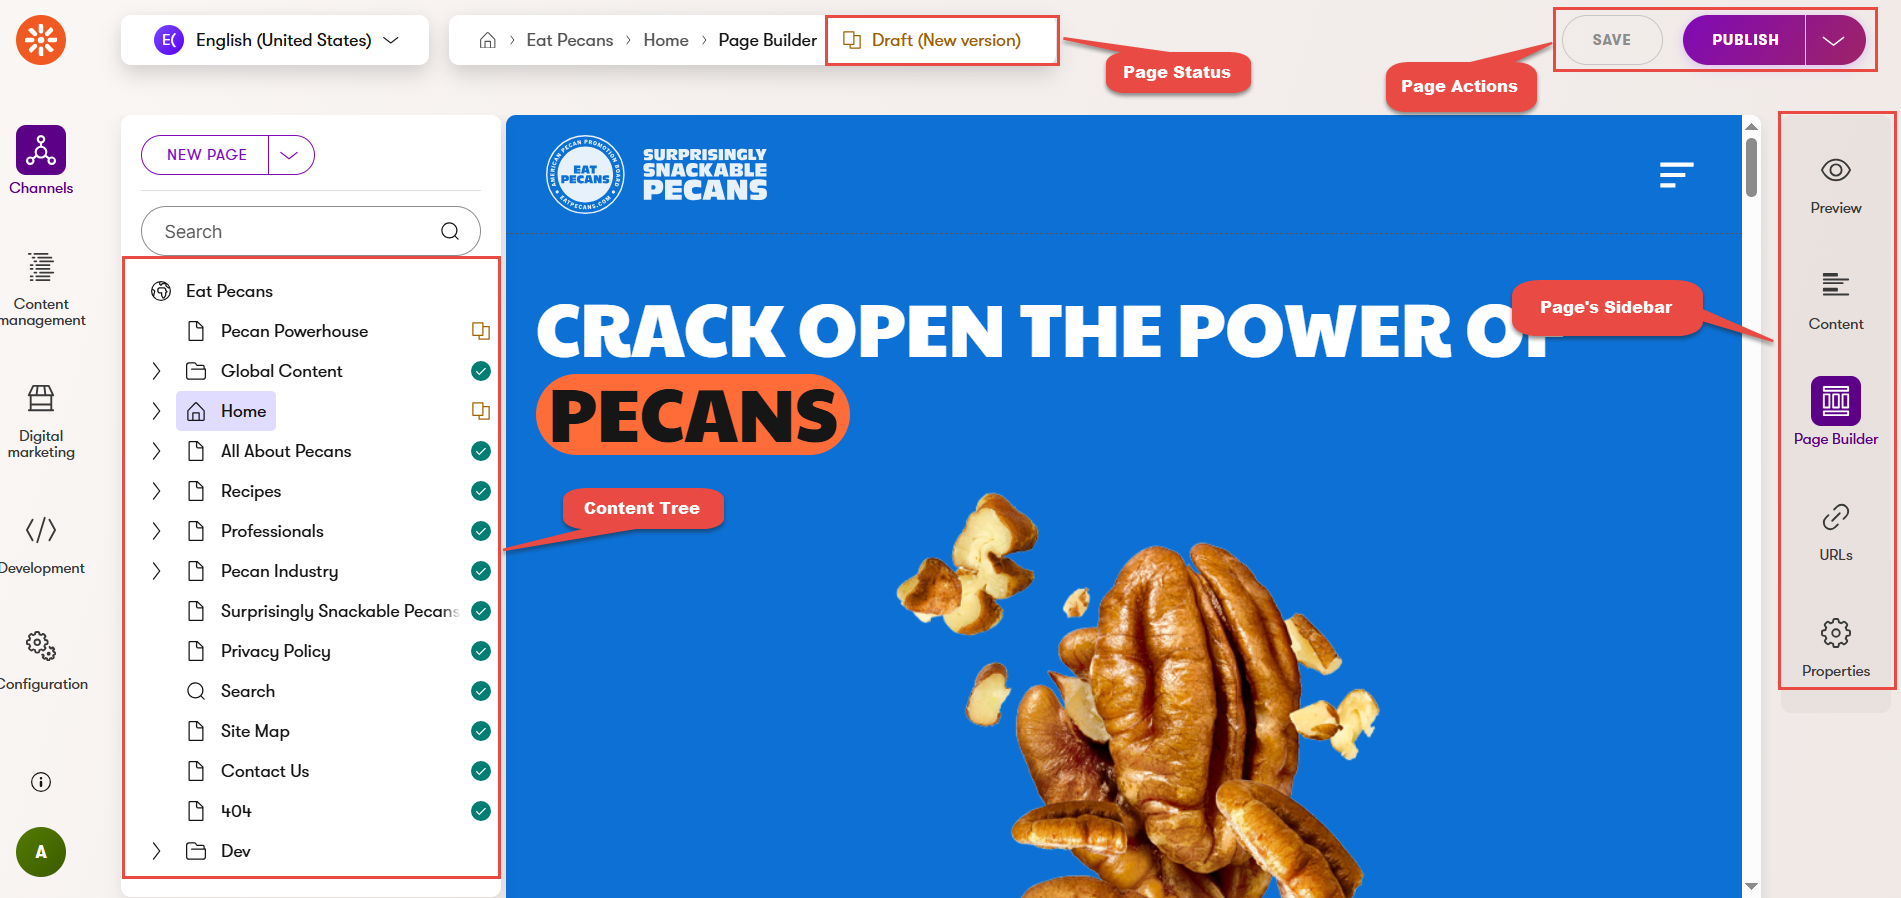
Website Channels Overview


Return to TOP

Content Types Overview


List of the different content types with names and icons

Page Types

Return to TOP

  1. Click on the Channels option on the upper left side 
  2. Click on Eat Pecans

Website Channel Navigation

Return to TOP

How to Search for an Existing Page

  1. Navigate to the Website Channel (Eat Pecans Channel)
  2. Click on Search field, located above the content tree
  3. Type the page name that you are looking for (or part of it) 
  4. Click enter
  5. A list will display the search results.
  6.  Click on the page you want to edit and select Page Builder or Content options, depending on the update you want to make.

Return to TOP

How to Create a New Page

  1. Navigate to the Website Channel (Eat Pecans Channel)
  2. If the page needs to be a child node, find the position on the tree and click on the parent node to select it (e.g., if you want to add a page underneath Professionals, select the Professionals node in the tree).  If the page does not need to be a child node, click on the Eat Pecans node at the top of the tree
  3. Click on New Page button located at the top of the content tree, or hover over the page status icon (next to the page name), click on the three dots, and select New Page
  4. Enter a page name and select the content type of your preference (e.g., General Content). 
    Note: The CMS will only show you the content types that are allowed for the part of the tree where you are adding the page. If you do not see a content type in the list, it means the content type is not allowed in that part of the content tree. 
  5. Click on Continue button and be sure to fill out at least the required fields (the fields with the red asterisk) 
  6. Click on Save button
  7. When you are ready for the page to be visible on the website, click on Publish button

Note: Once the Save button is clicked, the new page item will appear in the tree. You can drag and drop the page to the desired location in the tree if you wish for it to be in a different location.

Return to TOP

URL Best Practices for New Pages

The CMS will automatically generate the page URL slug, which is based on the page name you've given it. It's not necessary to include eatpecans.com or any parent pages in the URL slug; the CMS will automatically include the parent pages up to the root of the site's content tree when generating the URL after saving the page. As an example, the page "People Behind Pecans" has the URL slug of "people-behind-pecans". Because that page is a child of the All About Pecans page, the URL is https://eatpecans.com/all-about-pecans/people-behind-pecans.

Note: If you want to update the URL slug of a page, you should find and select the desired page, click on the URLs option from the sidebar, click on the Edit Page button, and click on the URL slug input field.

Best practices for page URL slugs include: 

  • Should be less than 100 characters for the whole URL (e.g., eatpecans.com/parent/child) 
  • Avoid using commas or special characters 
  • Use hyphens (-) to separate words 
  • Should be all lowercase 
  • Use natural human language and avoid using page IDs 
  • Avoid using article words (e.g., a, the, and, in, etc.)

Return to TOP

How to Preview a Page

Previewing a page allows you to see your changes before they are published to the live site. This step is highly suggested when updating a page. 

  1. Navigate to the Website Channel (Eat Pecans Channel)
  2. Find and click on the page in the tree that you wish to preview so that it is selected
  3. Click on Preview option from the right sidebar, then select the Open in New Tab button

Note: Content types that do not generate a URL (e.g., menu items, card items, bio items, etc) cannot be previewed as they do not have a URL. 

Return to TOP

How to Delete a Page

  1. Navigate to the Website Channel (Eat Pecans Channel)
  2. Find and click on the page in the tree that you wish to delete so that it is selected 
  3. Hover over the page status icon (next to the page name) and click on the three dots
  4. Click on Delete option
  5. Click on the Yes, Delete button

NOTE:  If the deleted content type is a page that had a URL, as best practice, a redirect for the deleted page should be created. 

Return to TOP

How to Create a Folder

  1. Navigate to the Website Channel (Eat Pecans Channel)
  2. Find and select the parent node on the tree (e.g., if you want to add the new folder underneath Professionals, select the Professionals node in the tree)
  3. Hover over the page status icon (next to the page name), click on the three dots
  4.  Select New Folder option
  5. Enter a name for the folder
  6. Click on Create button
  7. Click on Save button
  8. Click on Publish button

Return to TOP

How to Delete a Folder

  1. Navigate to the Website Channel (Eat Pecans Channel)
  2. Find and click on the folder in the tree that you wish to delete so that it is selected 
  3. Hover over the page status icon (next to the page name) and click on the three dots
  4. Click on Delete option
  5. Click on the Yes, Delete button

Return to TOP